
Math Can Be Sweet

Today's calculator cake is a special treat for any math lovers out there (yes, we do exist). I had been wanting to do a math cake for a while, but hadn't found the right occasion. I was going to do it for my husband's birthday, but went for a UK basketball theme instead. I don't find a lot of occassions for math cakes, as most people aren't as big of
My sister asked me a few weeks ago if I would make a calculator or math cake for her husband's birthday. He is a high school math teacher, and she thought he would like that theme. I looked around online and found what I expected - not a lot of math cakes out there... I decided to create my own, and came up with some ideas. This cake has three basic techniques used - piping, fondant decor, and Cake Cricut work. I have tutorials for all three, as well as the recipe for the cake. My brother-in-law is a big Oreo fan, so I did a chocolate cake with a Oreo cookies and cream buttercream.
Fondant work - Calculator
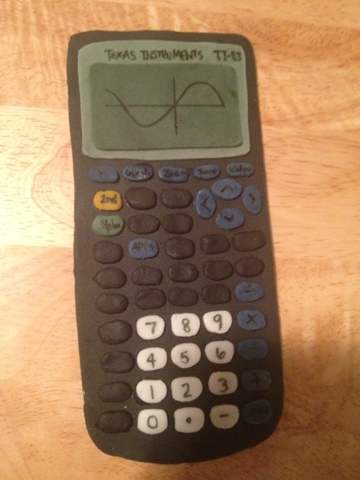
When creating a detailed fondant object like the calculator, I like to use the method of working with a print-out and Exacto knife.
- I printed several copies of a picture of the calculator, scaled to the size I wanted for the cake.
- I cut out the basic shapes for the calculator from the printouts (the overall shape, the screen, the area around the screen, the various shaped buttons, etc). These will serve as templates to cut out the fondant pieces.
- I rolled black fondant out to approximately 1/8".
- Using the exacto knife, I cut out the basic calculator shape using the printout as a template.
- I rolled out white and black fondant to 1/16" and cut out the respective buttons using the buttons from the printout as a template.
- I dyed white fondant the gray, green, blue, and yellow shades I needed for the remaining pieces.
- I cut out the screen, buttons, and remaining pieces. I again used the printouts as a template.
- Using gum glue (mixture of gum paste or fondant and water), I glued the pieces onto the calculator base.

Cricut Cake work - "Happy Birthday Jason" and numbers
Much to my excitement, my Christmas presents this year were centered around cake decorating and baking. I received a PINK KitchenAid mixer and a Cricut Cake Mini. I had seen a little about the Cricut Cake, and my sister uses the regular paper Cricut. Once I tried it out, though, I was hooked! It is so easy to make professional and detailed items for cakes. I got three cartridges filled with all kinds of objects, texts, borders, etc. I definitely wanted to try it out for this cake. There weren't a lot of math themed symbols and objects, but I was able to cut out the "Happy Birthday," "Jason," and the numbers. I think the items take the cake to a more professional looking level. I'm not the best at piping text, so this will come in very handy!
You can read more about the Cricut Cake on Cricut's website, or find them at most local craft stores. I haven't tried using rolled out fondant in the cricut yet, but love using the Wilton Sugar Sheets. They work just like paper, and are perfect for the Cricut Cake.
Piping work - Digits of pi

Another good tip is to use thin icing with a little piping gel mixed in. THe piping gel adds elasticity to the icing and keeps it from cracking. You may notice that some of my numbers cracked. I didn't have all my tools with me and did not add the gel. My icing was also a little too thick, I should have thinned it out. A smaller tip (#1, #3) also help if you want finer writing on a cake.
Chocolate cake ingredients:
- 2 cup sugar
- 1 3/4 cup all-purpose flour
- 3/4 cup Hershey's cocoa
- 1 1/2 tsp baking powder
- 1 1/2 tsp baking soda
- 1 tsp salt
- 2 eggs
- 1 cup milk
- 1/2 cup vegetable oil
- 2 tsp vanilla extract
- 1 cup boiling water
Cake Directions
- Preheat oven to 350F
- Combine all dry ingredients
- Add eggs, milk, vegetable oil, and vanilla into batter.
- Beat batter at medium speed for 2 minutes.
- Stir in boiling water - batter will be thin.
- Generously spray cake pan and fill with batter.
- I uses an 8 inch round cake 3 inches thick and baked it for about 50-55 minutes.
- Let cool before icing
Cookies and Cream Buttercream ingredients:
- 1/2 cup Crisco
- 1/2 cup butter (softened)
- 2 tsp vanilla
- 8 tsp milk
- 1 lb powdered sugar
- 4-5 crushed Oreos
Buttercream directions:
- Combine Crisco, butter, vanilla, and milk.
- Beat until mixed well.
- Add powdered sugar about 1/4-1/2lb at a time.
- If too thick consistency, add additional tsp's of milk.

